Monday, 21 January 2013
Saturday, 19 January 2013
STYLE MAIDEN BRAIDS
Steps 1-2: Braid two strands on each side of a center part.
Steps 3-5: Wrap braids around the crown of your head and pin in place with one pin each.
Step 6: Arrange braids so that they cover the front of your head like a headband. Pin into place more securely until you feel comfortable.
Steps 7-8: Pull the rest of the hair into a ponytail and pin it into a cute messy bun. Note: This step is optional. You can also wear your hair down like my photo below.
Step 9: Add final pins and spray. Enjoy!
Friday, 18 January 2013
rhombus flower Bracelet
Fashion Bracelet Retro style rhombus flower Bracelet Green
Fashion design, especially for Gift, Party, and Anniversary.very new and unique in its style.. give stylish look to ur hands...
1. Style: Fashion
2. Color: Green, as show
3. Material: Acrylic, Alloy
4. Perimeter: around 19 cm
5. Width: 4.5 cm
other colours ....
Fashion Bracelet Retro style rhombus flower Bracelet Orange
Fashion Bracelet Retro style rhombus flower Bracelet buff
Thursday, 17 January 2013
stylish nails
One of the hottest new trends this spring is colorblocking, but not everyone knows how to put it together for clothes.
Step 1: Get Your Supplies Together
Start with your favorite basecoat and paint your nails the base color. I find it’s easiest to use a crème polish for this step, and it’s best if this is the lightest color of the bunch, since it doesn’t need to cover anything else. Then top with a fast-dry topcoat.
Step 3: Start Taping
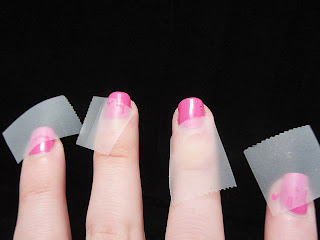
Next, pull off a small piece of Scotch tape (you won’t need more than an inch at a time) and put it against your hand and pull it off several times until most of the stickiness is gone. This will help make sure the polish doesn’t pull when you start applying the next color. (If you are dressing up a current manicure, this is where you will start.)
Once your base layer is dry, it’s time to start the colorblocking. I like each nail to be unique, so I tape each one differently. Remember to make sure the tape is lying down flat so the polish doesn’t seep underneath and that the tape is at an angle so that it will eventually form triangles.
Step 4: Apply the Second Color
Carefully paint your nail so the exposed part is your second color and make sure to paint over the tape so you have clean lines. It’s best to work quickly and with your second most opaque color for this layer.
Step 5:Remove Tape to Reveal Precise Triangles
Step 6: Marvel at Your Work
Step 8: Paint the Last Color and Finis

Step 1: Get Your Supplies Together
Step 2: Paint a Base Color
Step 3: Start Taping
Next, pull off a small piece of Scotch tape (you won’t need more than an inch at a time) and put it against your hand and pull it off several times until most of the stickiness is gone. This will help make sure the polish doesn’t pull when you start applying the next color. (If you are dressing up a current manicure, this is where you will start.)
Once your base layer is dry, it’s time to start the colorblocking. I like each nail to be unique, so I tape each one differently. Remember to make sure the tape is lying down flat so the polish doesn’t seep underneath and that the tape is at an angle so that it will eventually form triangles.
Step 4: Apply the Second Color
Carefully paint your nail so the exposed part is your second color and make sure to paint over the tape so you have clean lines. It’s best to work quickly and with your second most opaque color for this layer.
Step 5:Remove Tape to Reveal Precise Triangles
Wait about thirty seconds after you paint over the tape and carefully pull the tape up to reveal a clean little triangle! Now each nail might be a different shape, depending on how you taped them up originally!
Step 6: Marvel at Your Work
Now it’s time to tape off the last part of the color block. Like you did for the first part, you’ll want to tape your nails at an angle to make the last triangle on each nail. On a few nails, you will need two pieces of tape to make the triangle in the middle, so be careful to make sure everything lines up with the colors you have already painted.
Step 8: Paint the Last Color and Finis

Just like before, paint over the exposed part of your nail and the tape to get the third part of your color block on. Once it’s painted, wait thirty seconds and then pull it off to see the amazing color block you just created! Add a topcoat and you are finished!
Wednesday, 16 January 2013
Tuesday, 15 January 2013
Saturday, 12 January 2013
Friday, 11 January 2013
gOLd jeWelRy
wOnderfuL cOmbinAtion oF gOlden nD siLivEr.... verY uniqUe in iTs styLe .. so simpLe bUt sO stYliSH ... vErY vEry sUitaBle foR wedDinG cerEmonieS... lOok aweSome wiTh eVeRy cOlOur oF dreSs... liGht wEiGhtEd... eyE caTcHiNg dEsiGN oF nEcKlEsS nD pEndaNtS... alSo weAr iN cAsuAl pARtiEs... hoPe u aDmirE this dEsigN foR mOrE unIquE dEsiGnz kEep oN vistiNg .. thankyou
stYliSH whiTe drESs
sO siMple nD decEnT dreSs wiTh the aweSome coLour cOmbinaTion oF rEd nD whitE... vEry iN now A dayZ... liTe woRk of coPper nD red oN front nD seleveS give thiS dreSs stUnNinG lOOk...reD rIbbIoN on boaDerS nD selevEs bOosT iTs stYliSh lOok. reD doPata witH siMpLe coPper worK makE this dreSs goRgeoUs... for morE dreSSeS keeP oN visiTing ...
Thursday, 10 January 2013
cOloUrfUL nAilS
stuNNing colourFuL naiL aRT.. lOok awEsome wiTh evEry drESS .. doUble colouR combinatiOn on eAch nAiL bOOsT itS styliSh lOok ..morEovEr diFferent styles oF heArt oN eacH naiL make it more dEliGhtfUL.. likE on fiRsT finGer there iS a cOmbinatioN of blUE nD pUrplE lOOkS aWEsOmE nD thE aRRoW heARt on iT mAKE iT moRe stYliSH.. hope U lIkE iT foR mOrE cOlOurfUL naiL aRT kEEp oN visiTinG weBsItE.. tHaNkYoU aWLL ...
Wednesday, 9 January 2013
hOw tO makE hEart On nAiLX
makes heart on nails to make your nail colour more stylish ...
tHingS nEeDeD:
*nail colour
*pik
juSt foLlow 4 simple stEpS.
1.make one dot of nail colour with pick.
2.then make second dot on little distance
3.penetrate the second dot below..
4.do same with first dot with care.. now your heart on nail is ready...
tHingS nEeDeD:
*nail colour
*pik
juSt foLlow 4 simple stEpS.
1.make one dot of nail colour with pick.
2.then make second dot on little distance
3.penetrate the second dot below..
4.do same with first dot with care.. now your heart on nail is ready...
Tuesday, 8 January 2013
MorE TrEndy & StyLIsh MAKE UP fOr brOwn hAIR
Brown hair tend in give the skin a monochromatic appearance, fOr mOrE beautiful look create suitAble cOntrasts with neutral cOlors and livEly tOnes:
Eyes: Try ivory,beige and grey eye shadow and brown eyeliner.
Cheeks: Choose blush in pale Rose,fuchsia,pink or brown tones.
Lips: Choose Rosy brown,red and glossy pink lipstick.
Eyes: Try ivory,beige and grey eye shadow and brown eyeliner.
Cheeks: Choose blush in pale Rose,fuchsia,pink or brown tones.
Lips: Choose Rosy brown,red and glossy pink lipstick.


 17:36
17:36
 Unknown


.jpg)


